
The following instructions explain how to add your home Wi-Fi and configure a fallback hotspot on your BirdNET-Pi. This ensures that the system can be accessed both within your local network and in the field.
When the BirdNET-Pi is within range of a configured Wi-Fi network (e.g., your home network), it will automatically connect to it. If no known network is available, the device will switch to hotspot mode and create its own network. This hotspot does not provide internet access but allows direct connection to the Raspberry Pi.
Instructions (Network Manager)
- If you are no longer connected via SSH, reconnect and enter the password ‘mauersegler’. Replace ‘00’ with the number on your Raspberry Pi.
ssh birdnet-admin@birdnet-rpi00.local- First, we need to open the Network Manager:
sudo nmtui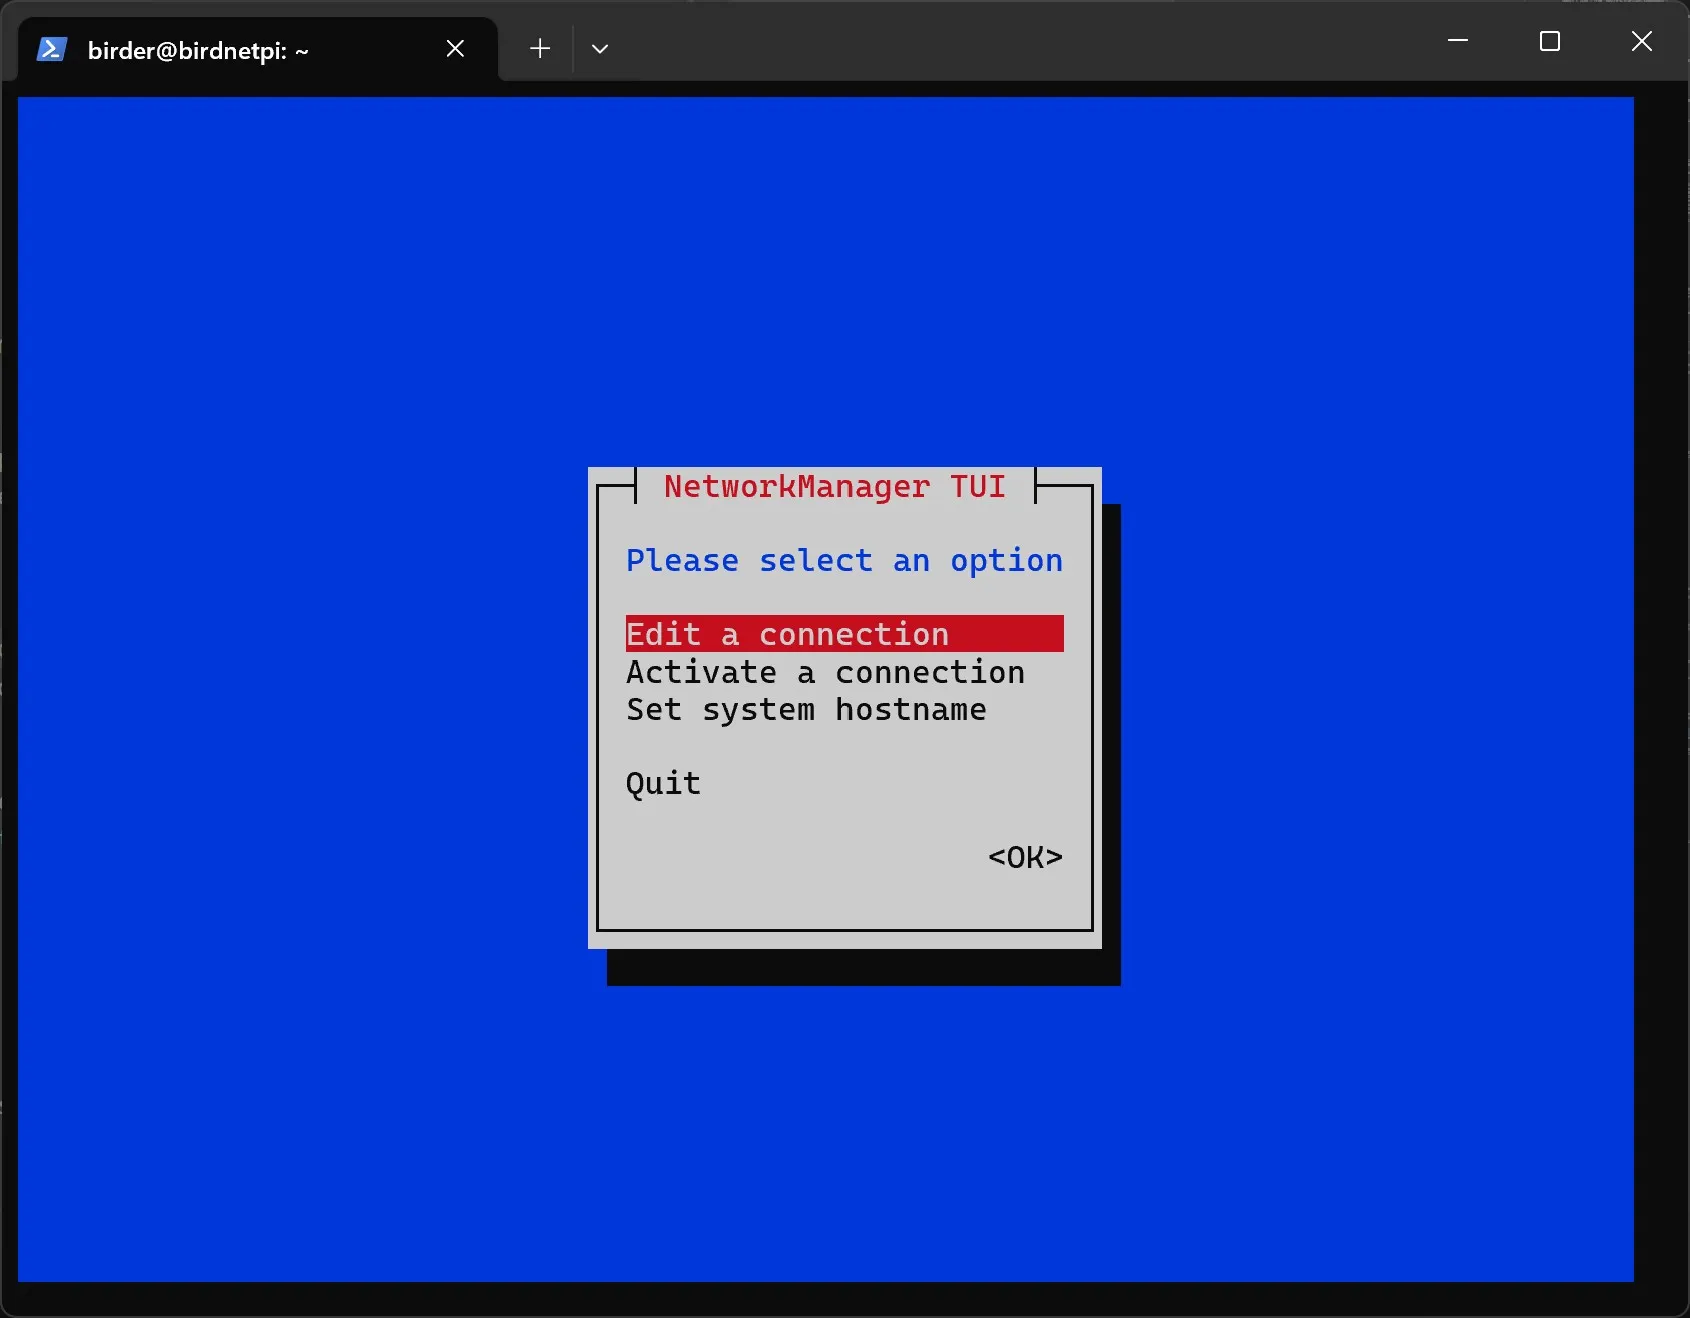
-
In Network Manager, you can move the selected item using the ← ↑ → ↓ arrow keys and confirm with Enter ↵.
-
Select
Edit a connection.
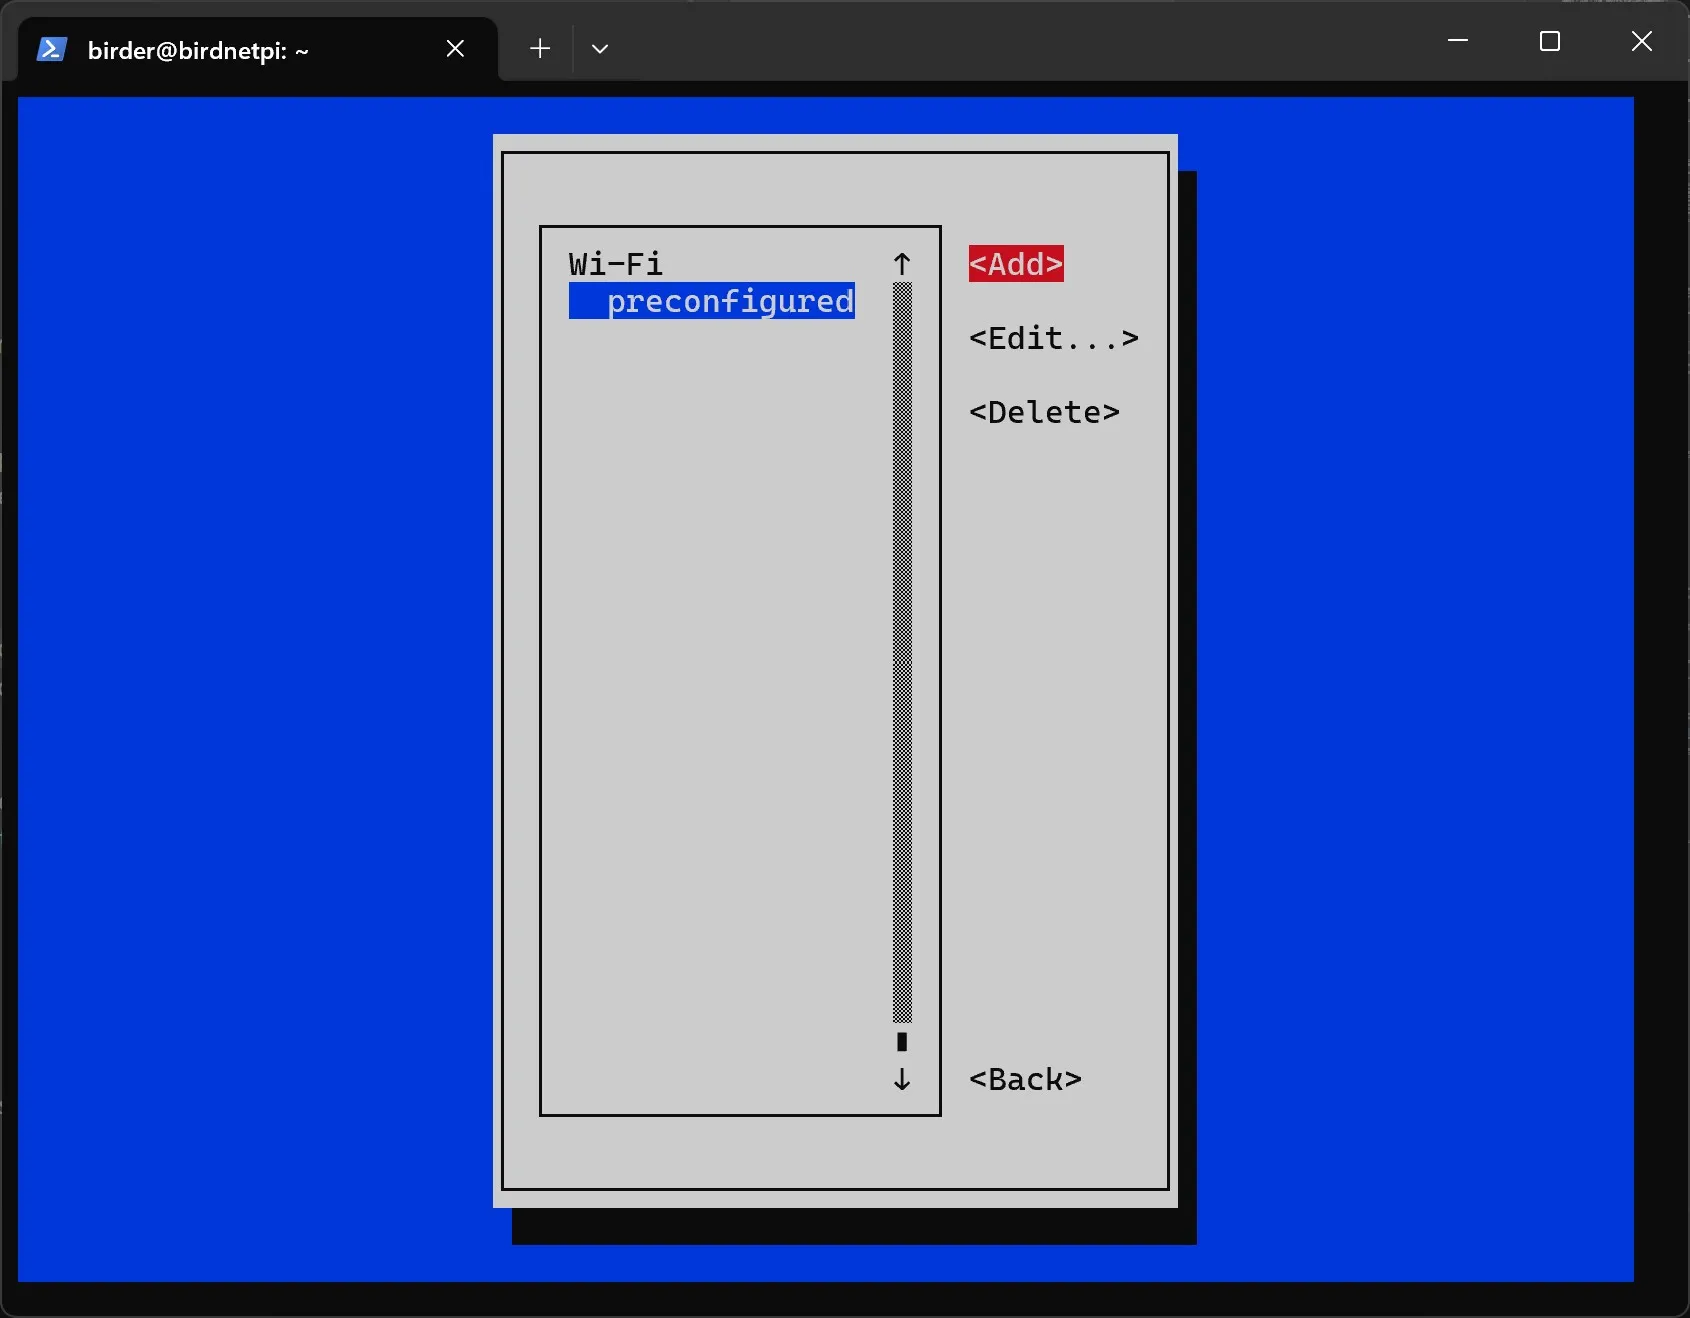
- Select
Add.
- Select
Wi-Fias the connection type.
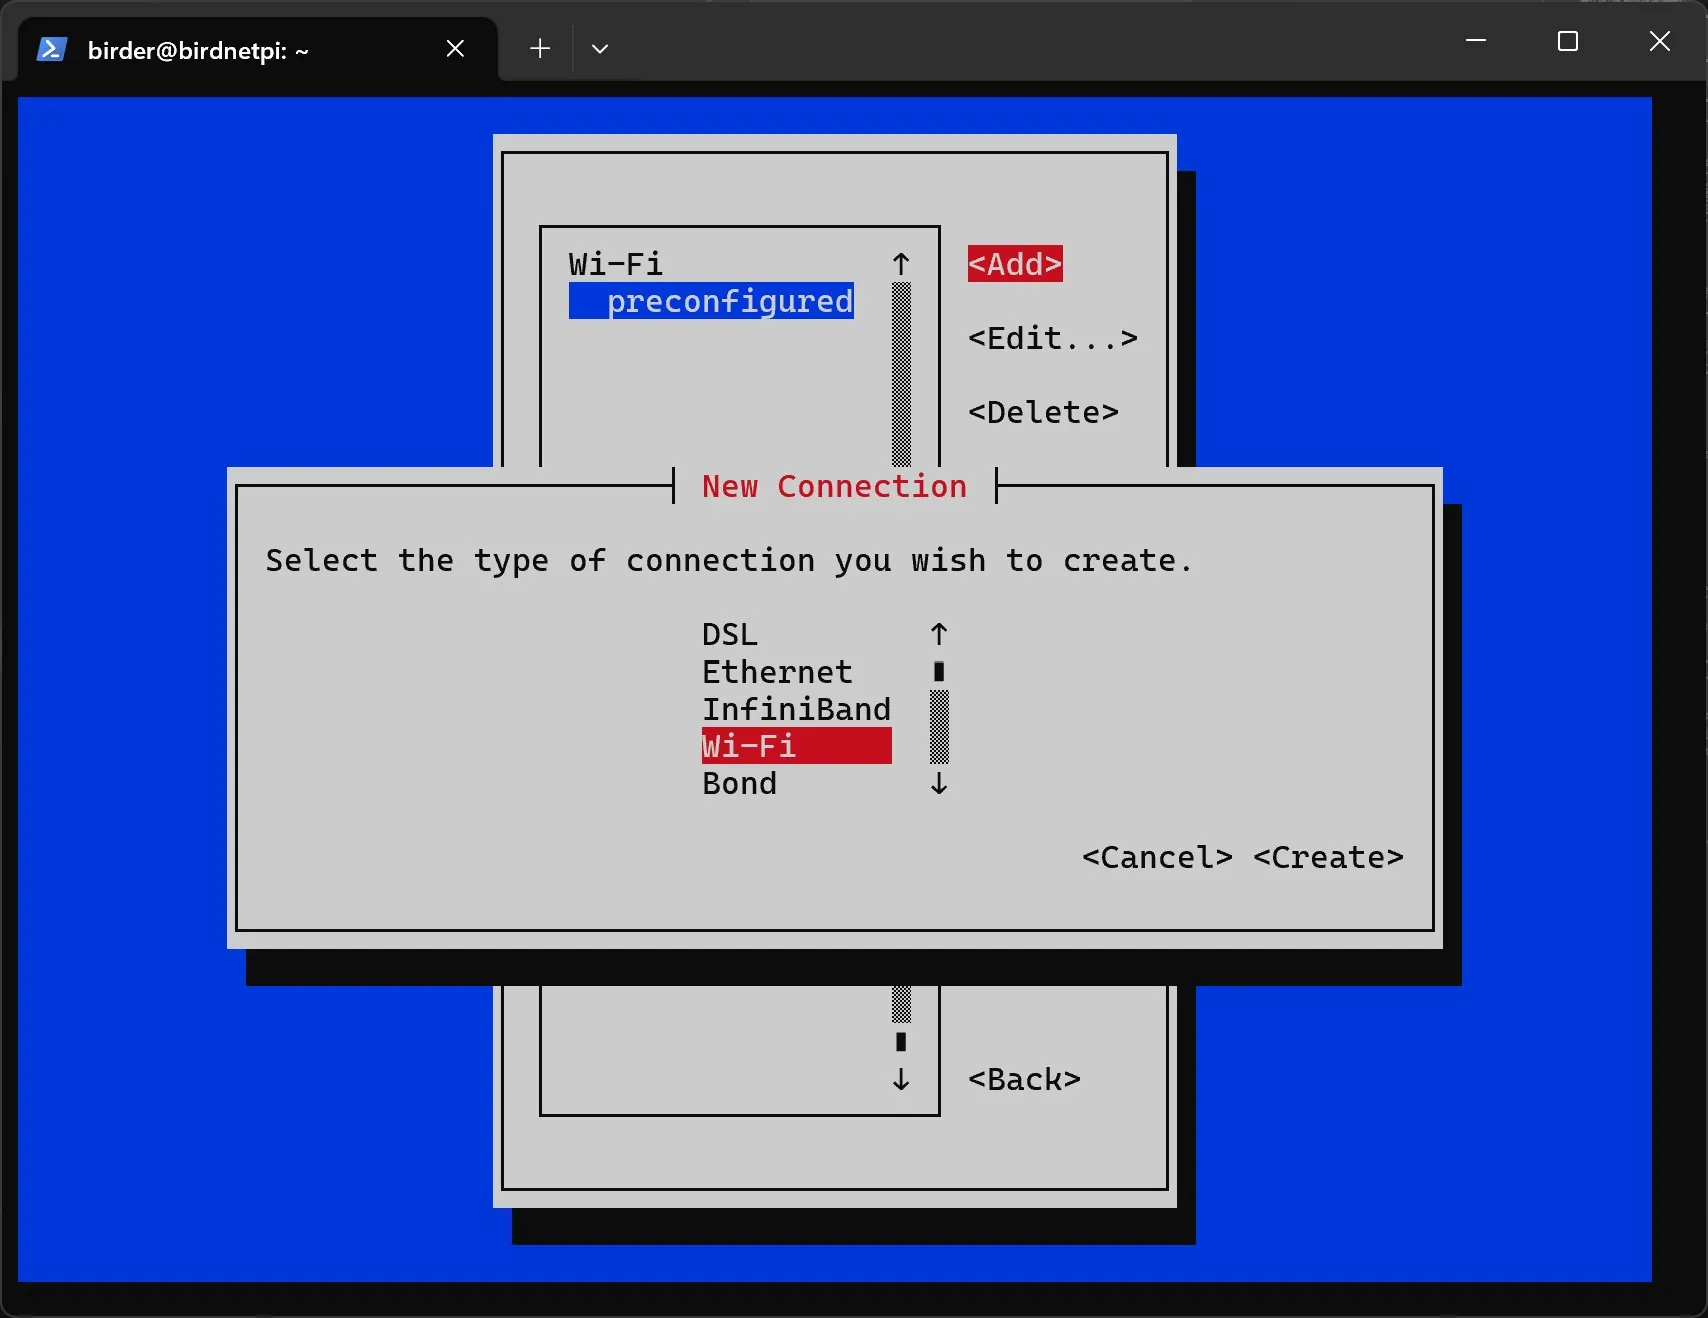
- Select
Create.
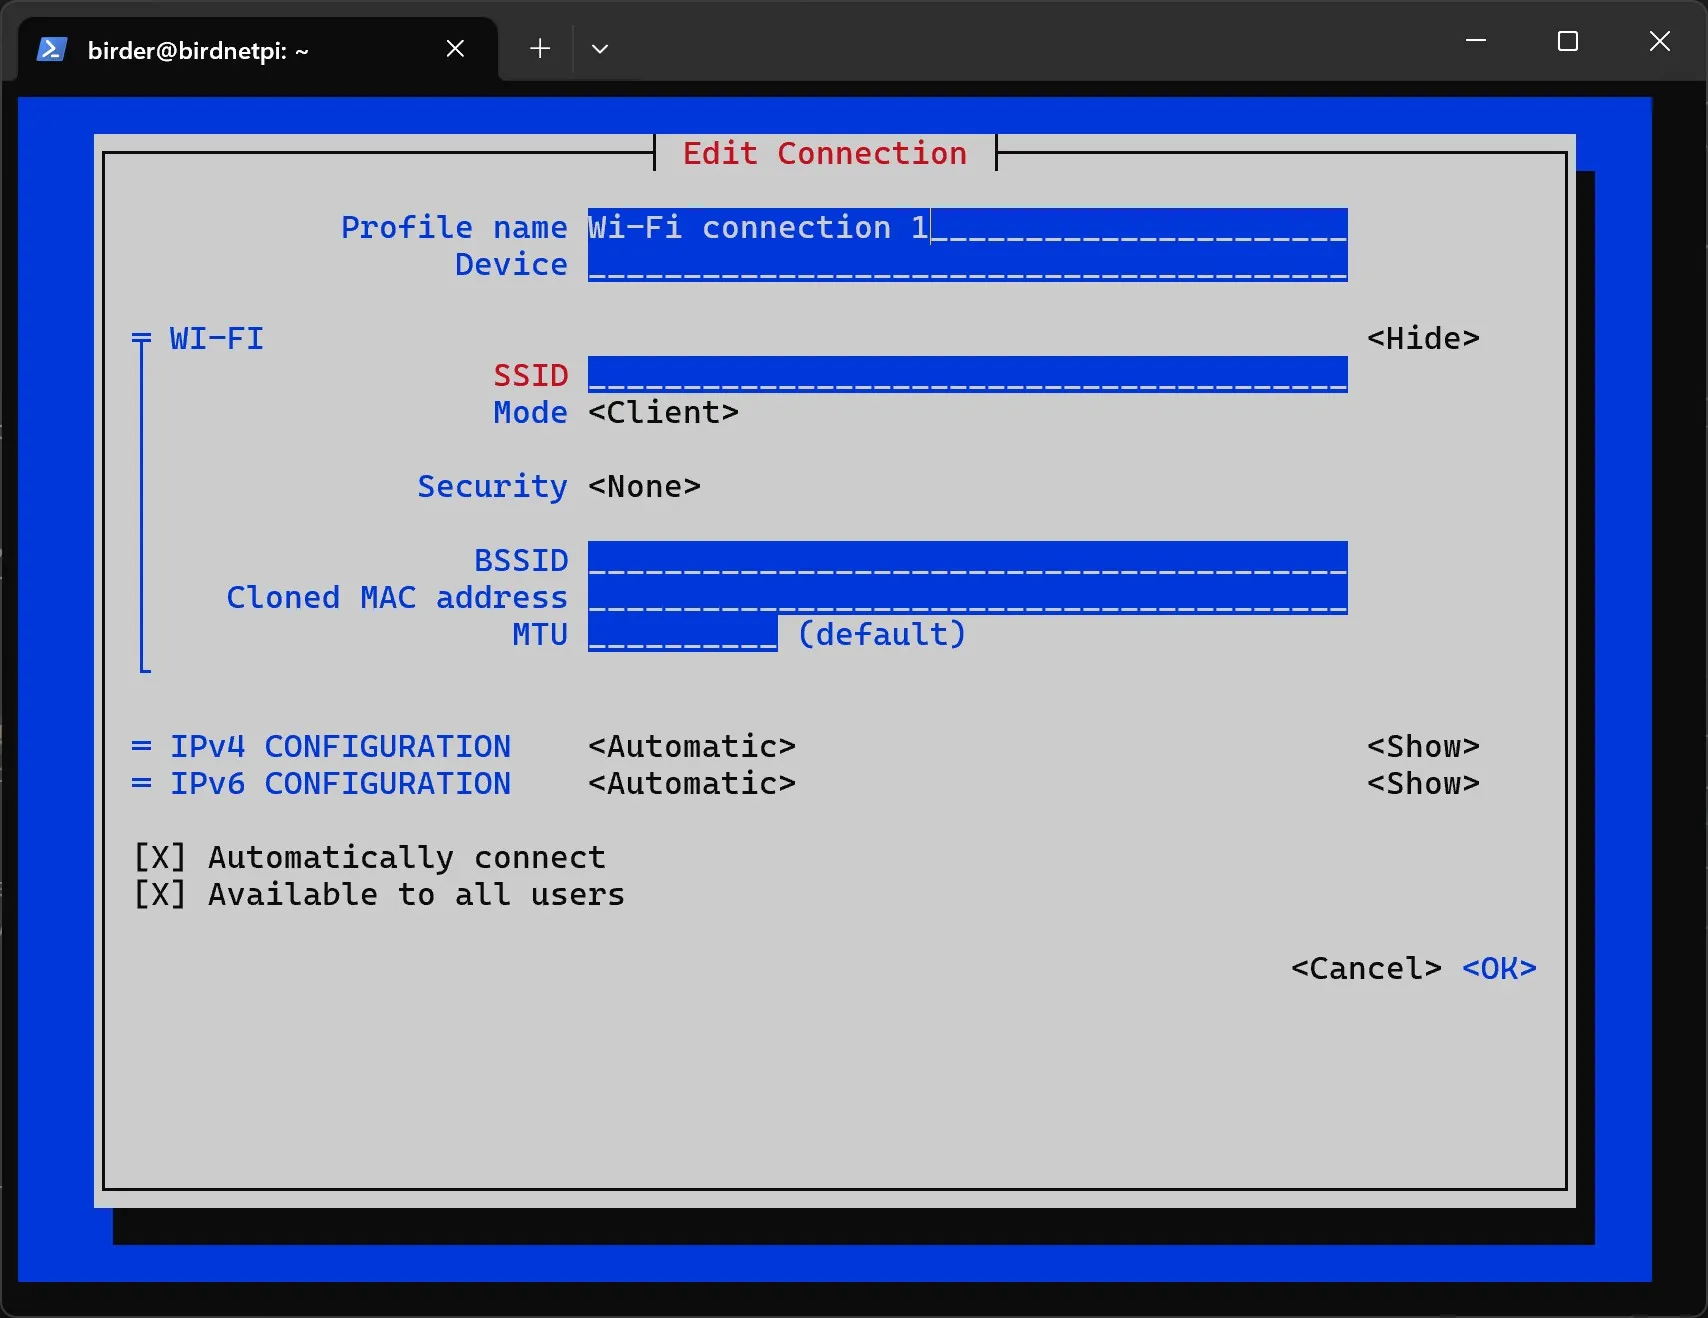
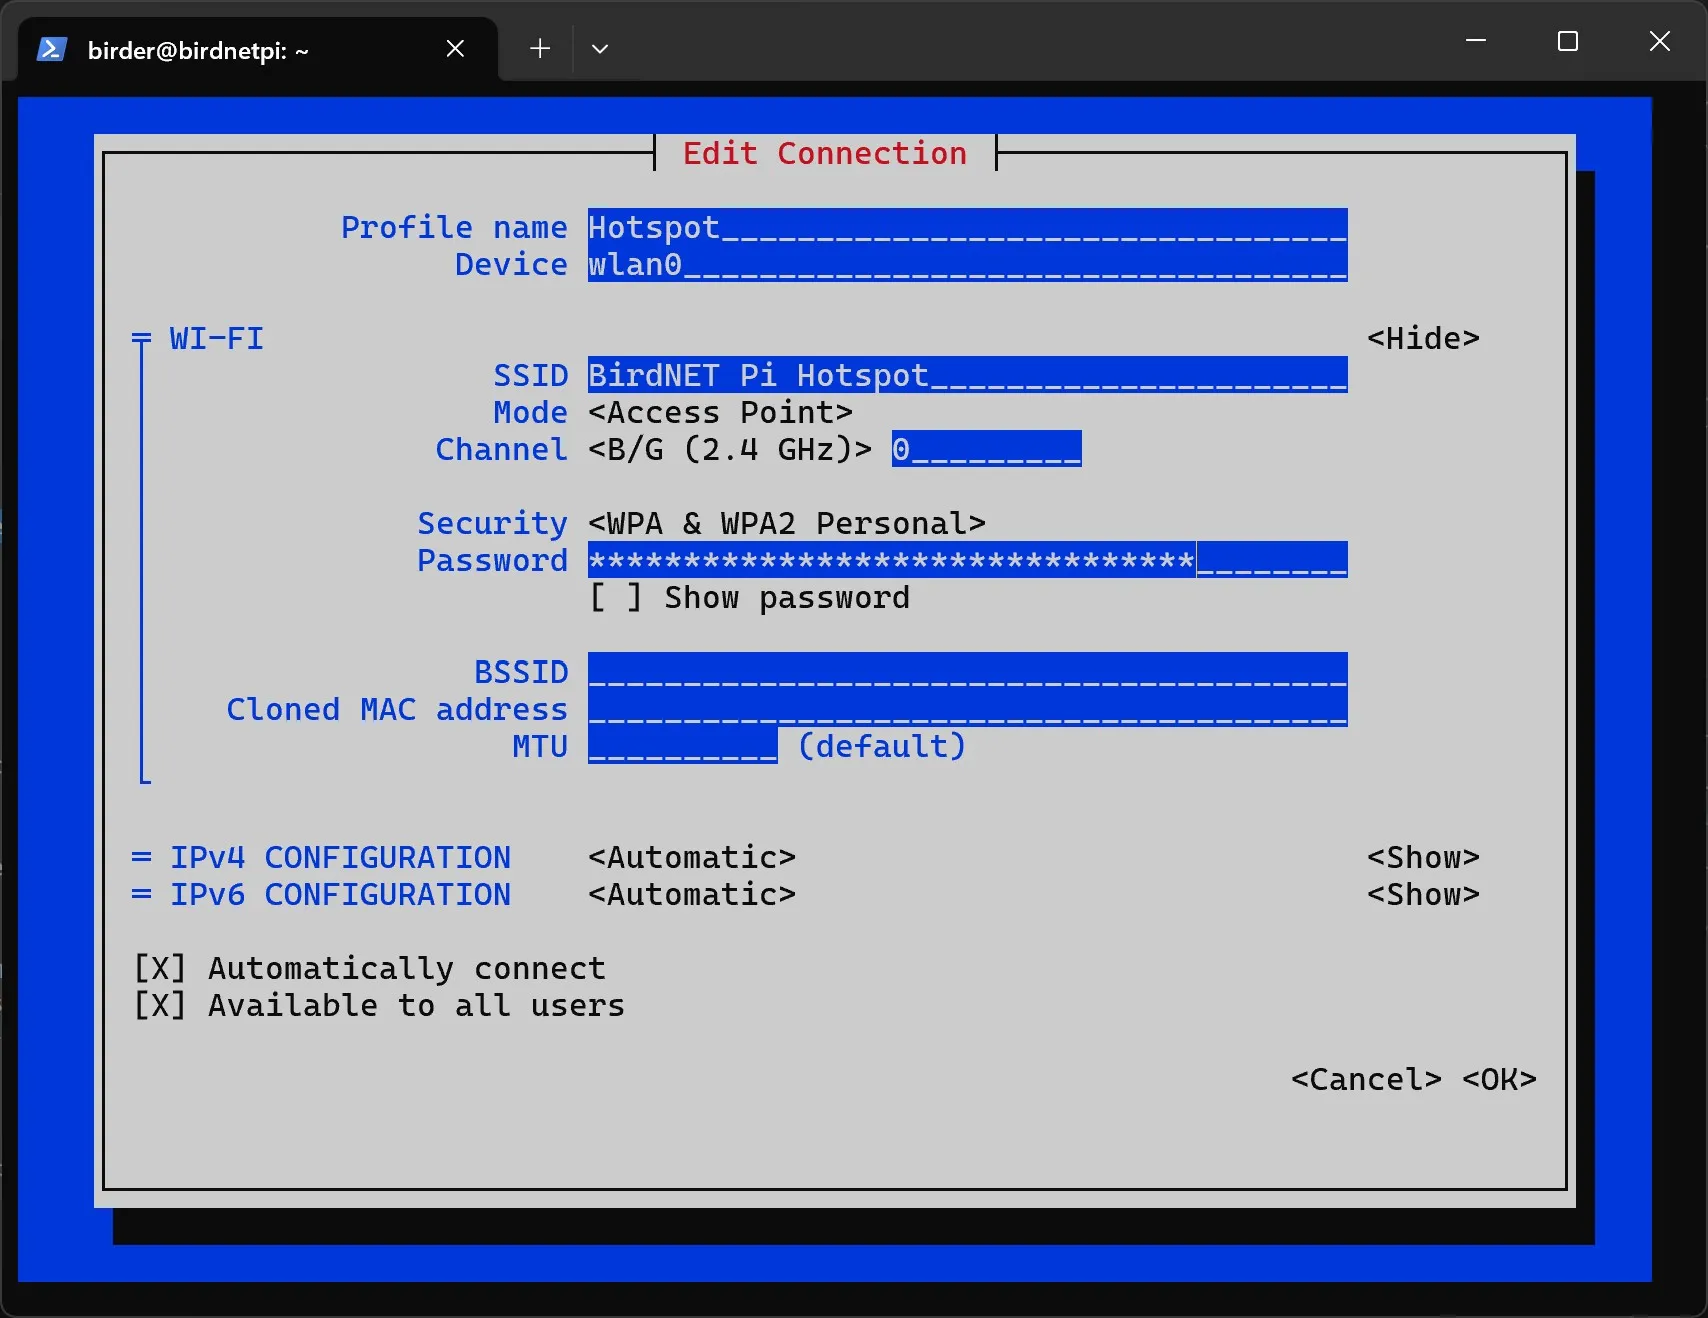
- Now you need to add your network configuration. Let us start with the hotspot settings.
- Profile Name: Used for identification only. It is recommended to use the name
Hotspot, otherwise make sure to replaceHotspotwith your chosen name in the following commands. - Device: Write
wlan0. This is the name of the Wi-Fi interface on the Raspberry Pi. - SSID: This is the name of the Wi-Fi network that will be created. You can choose it freely. Since there are many Raspberry Pis in the workshop, make it unique so you can easily identify your device. Make sure to remember it.
- Profile Name: Used for identification only. It is recommended to use the name
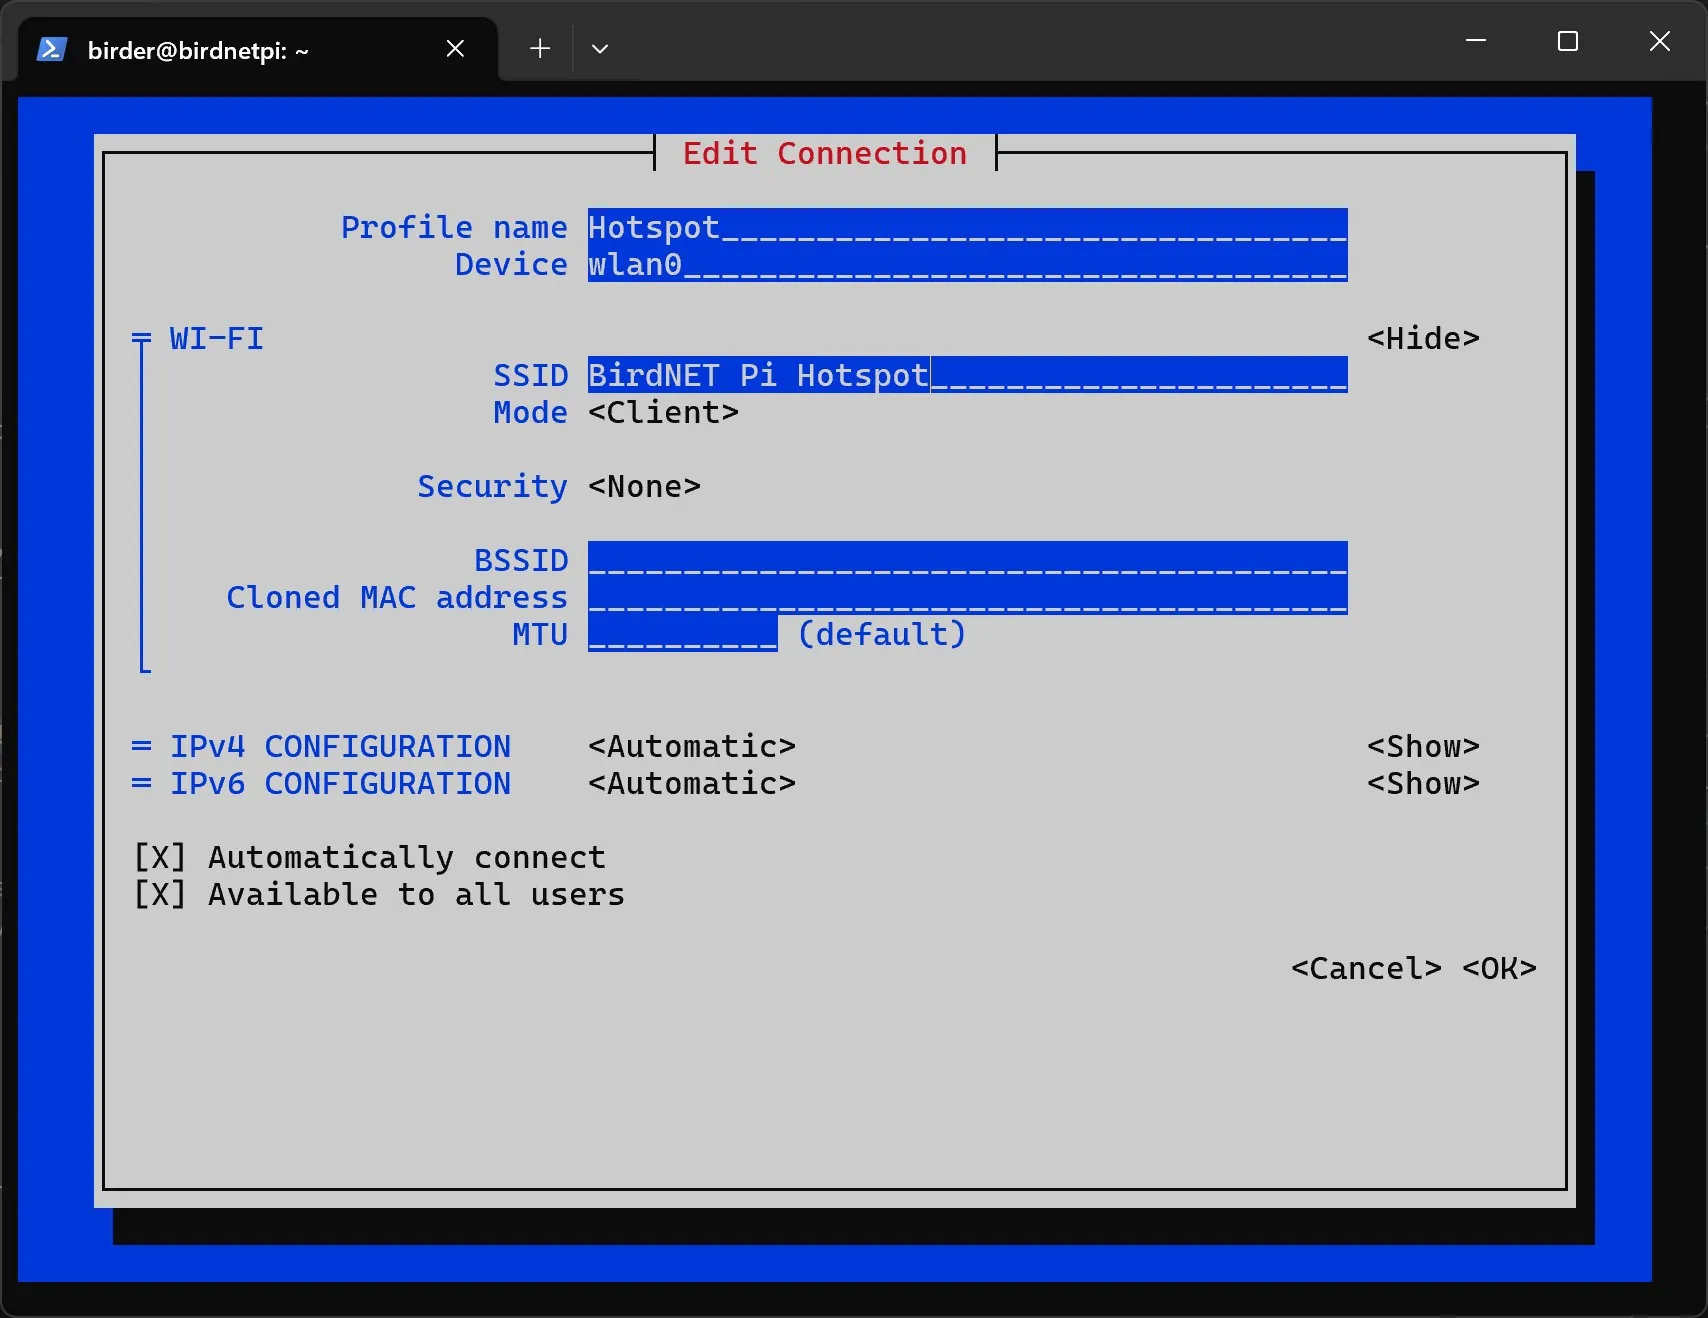
- Select
Access PointforMode. (Clientis for adding a Wi-Fi network, which we will do later.)
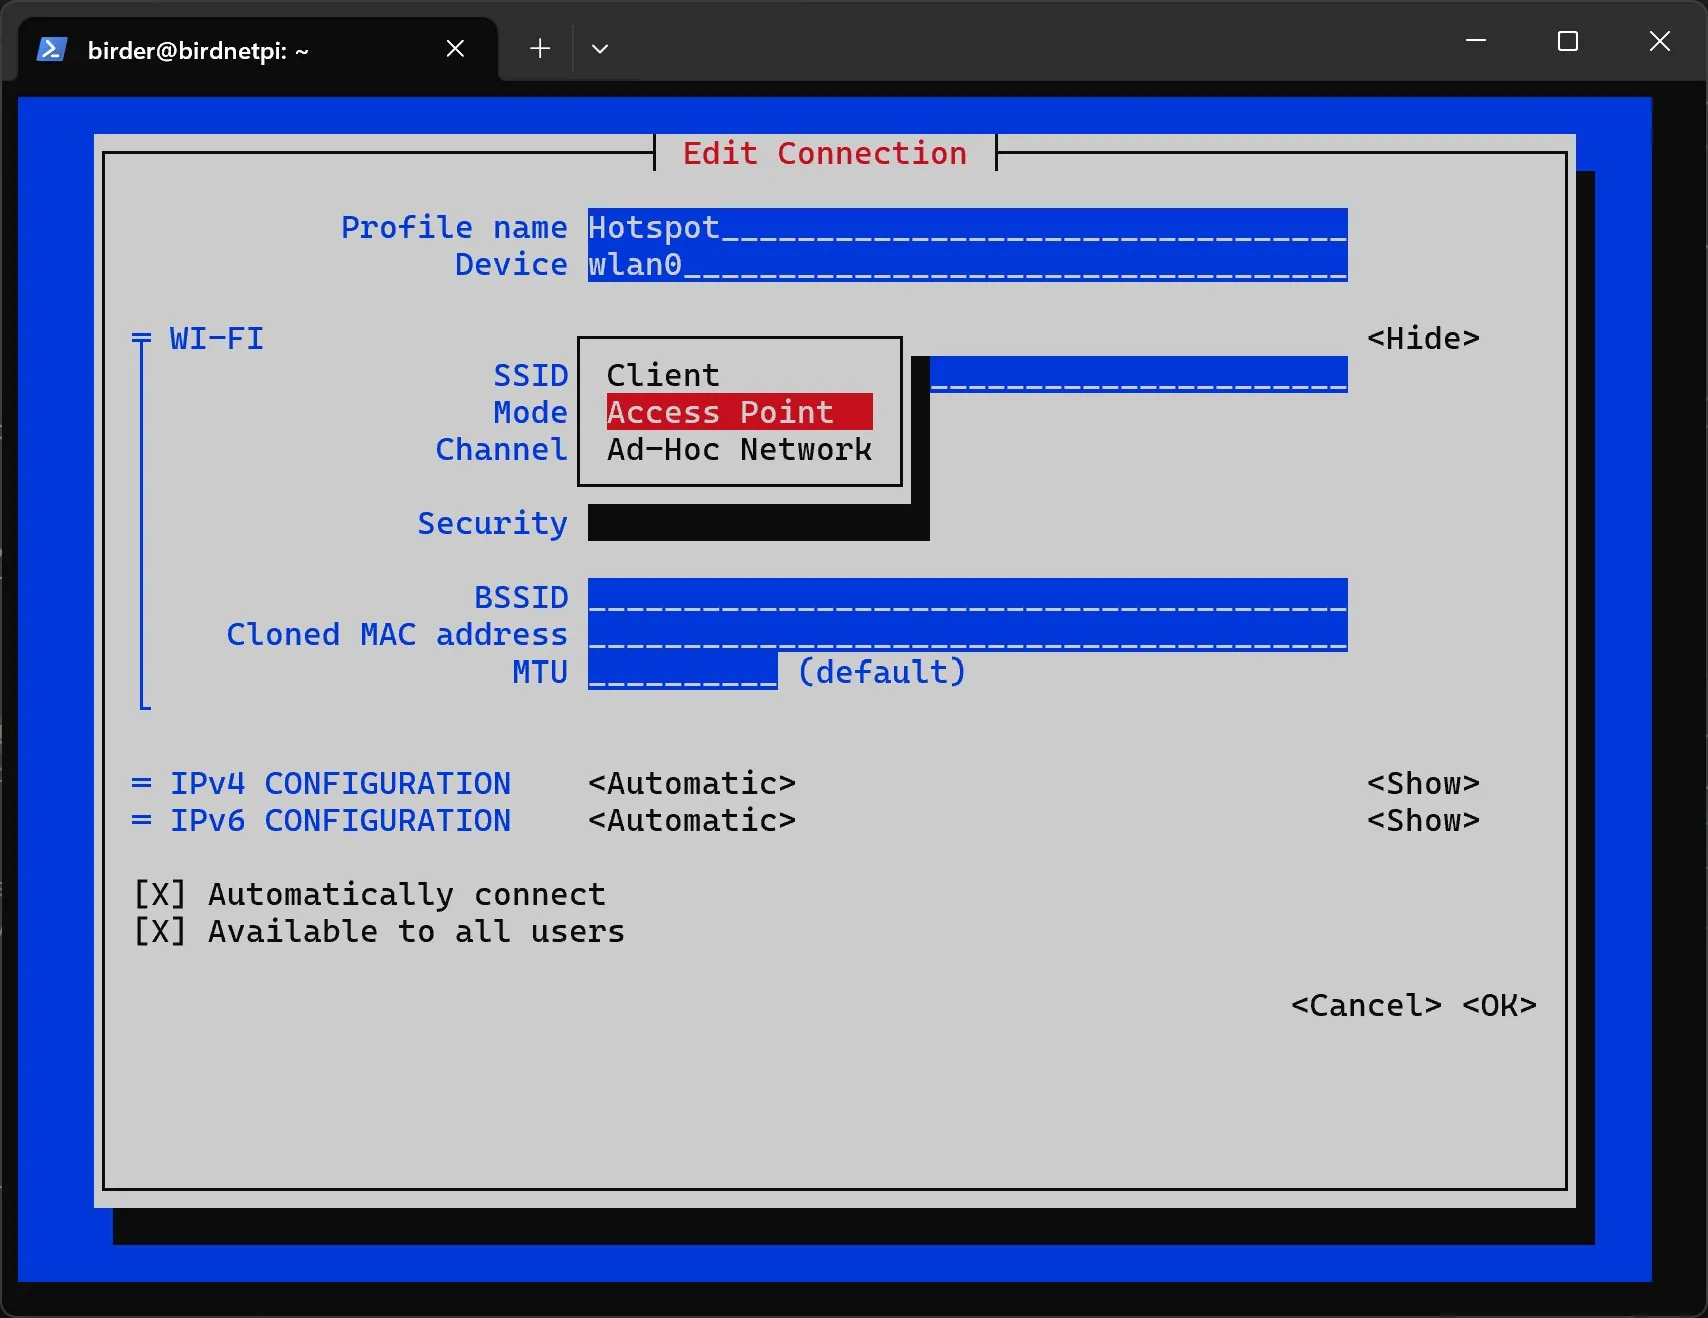
- Select
B/G (2.4 GHz)forChannel.
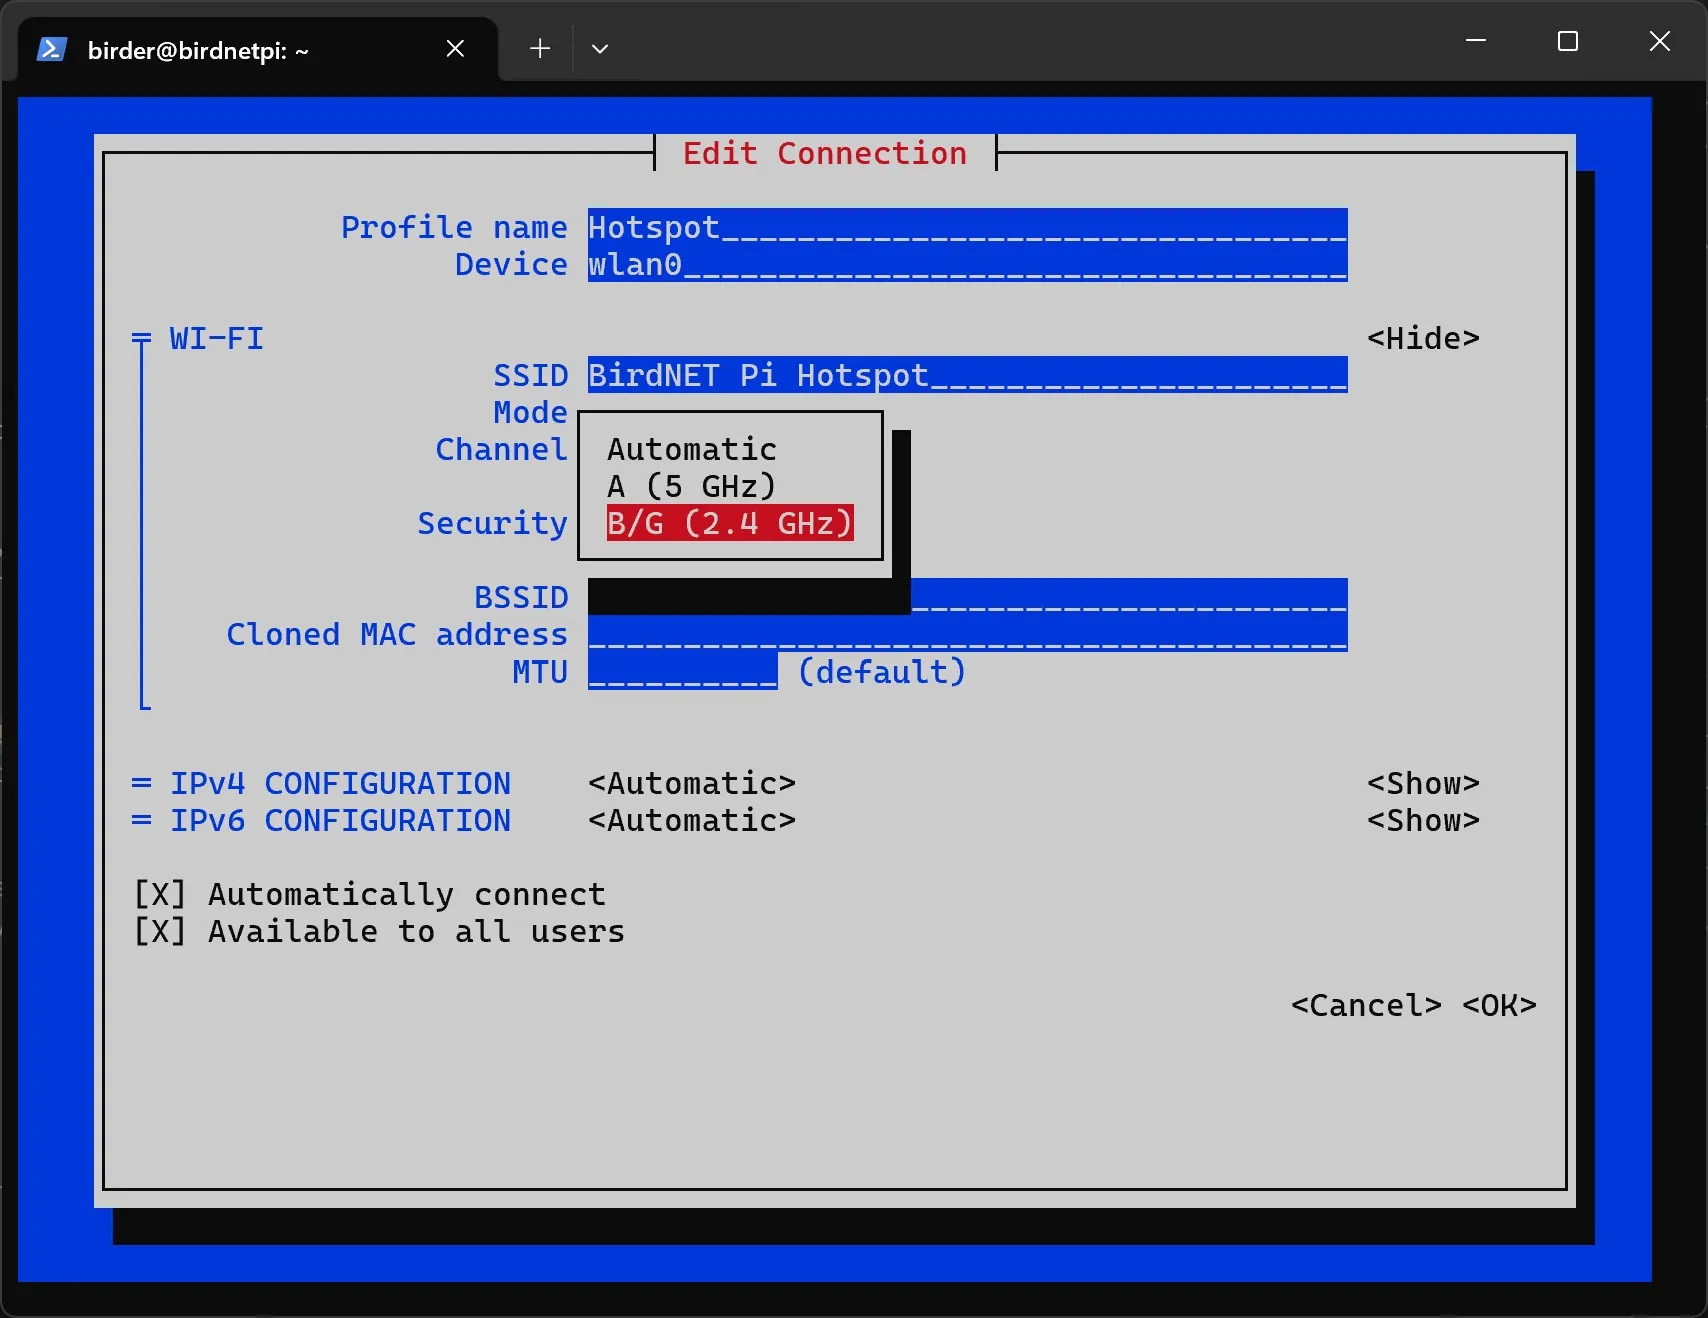
- Under
Security, selectWPA & WPA2 Personal.
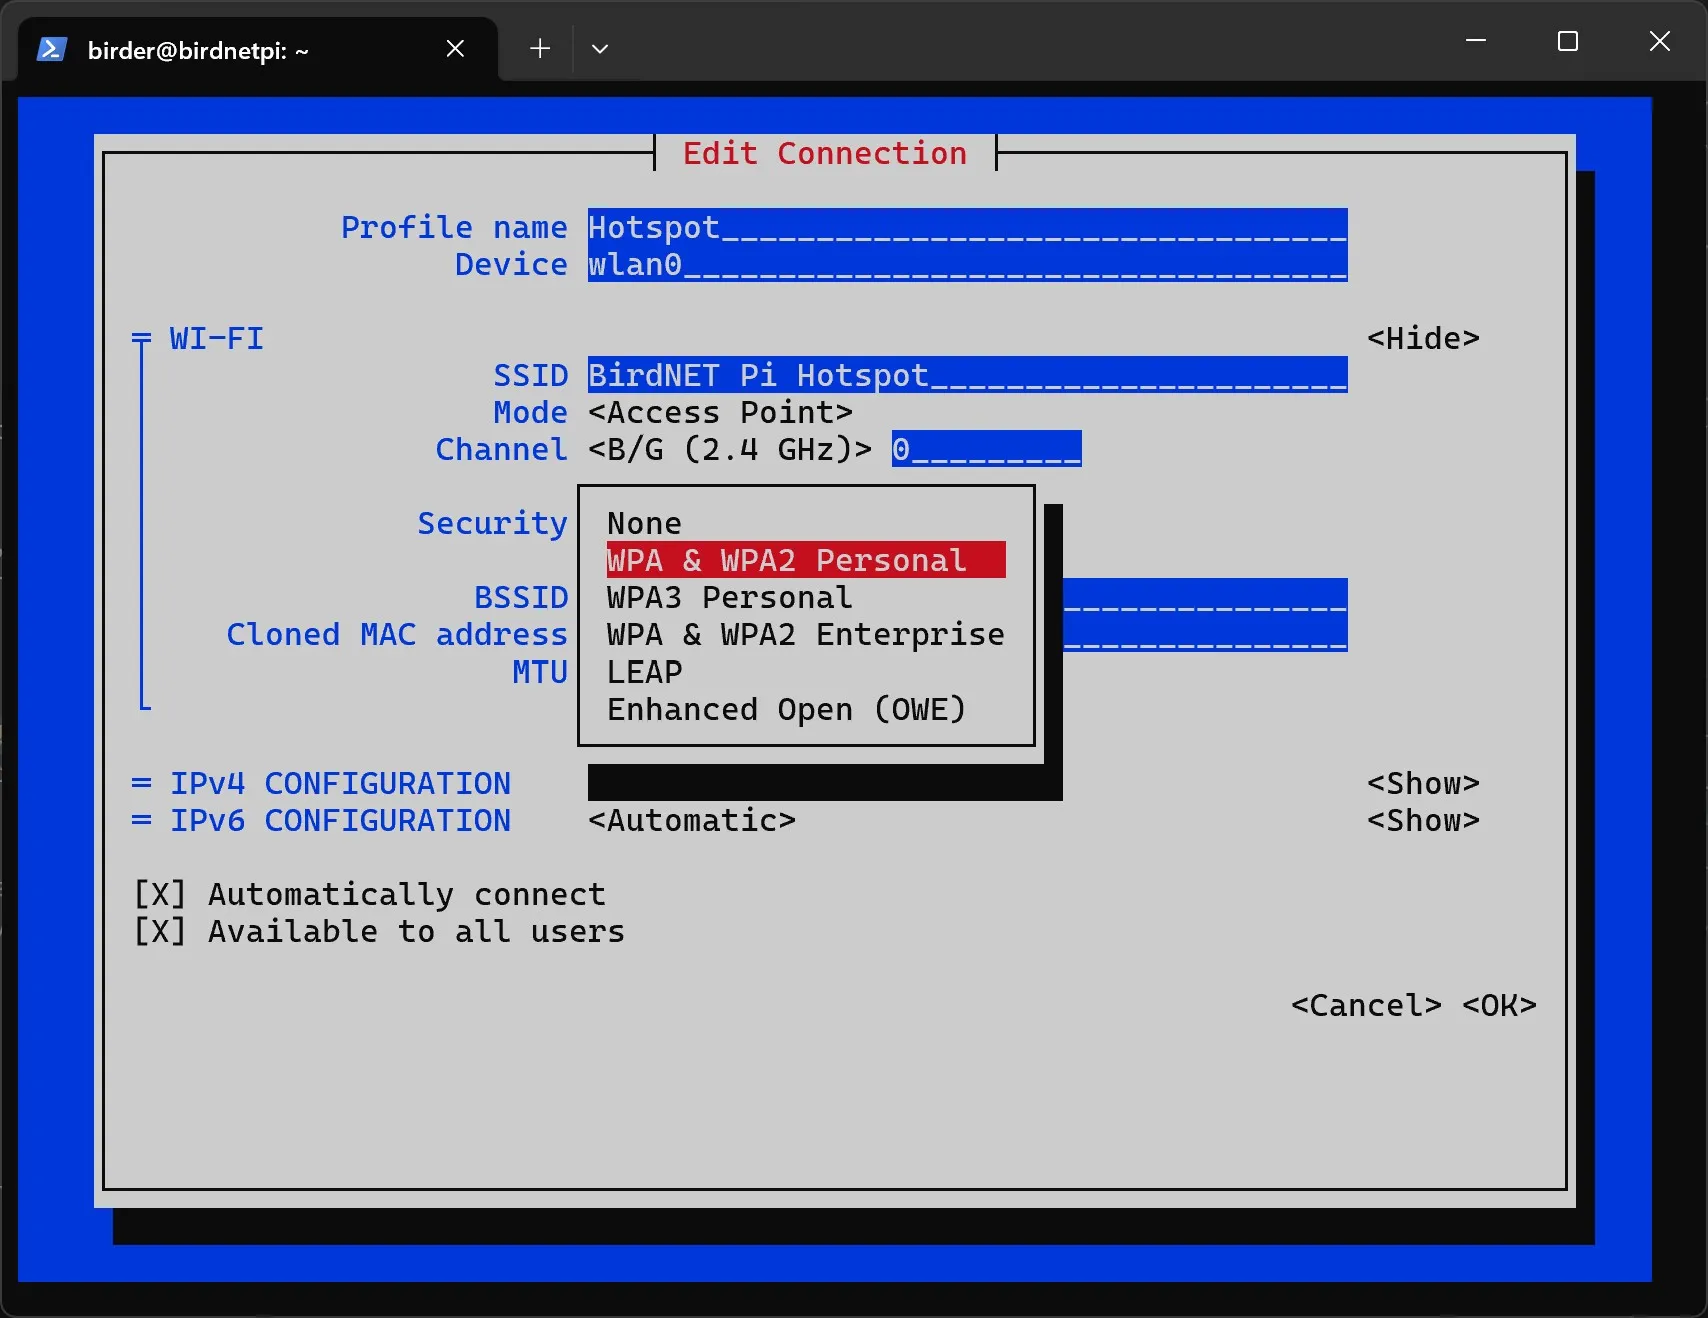
- Under
Password, enter a password for the hotspot. Remember it! This password will be required to connect to the hotspot later.
- Configure the IP settings as follows: IPv4 Configuration
Shared, IPv6 ConfigurationDisabled.
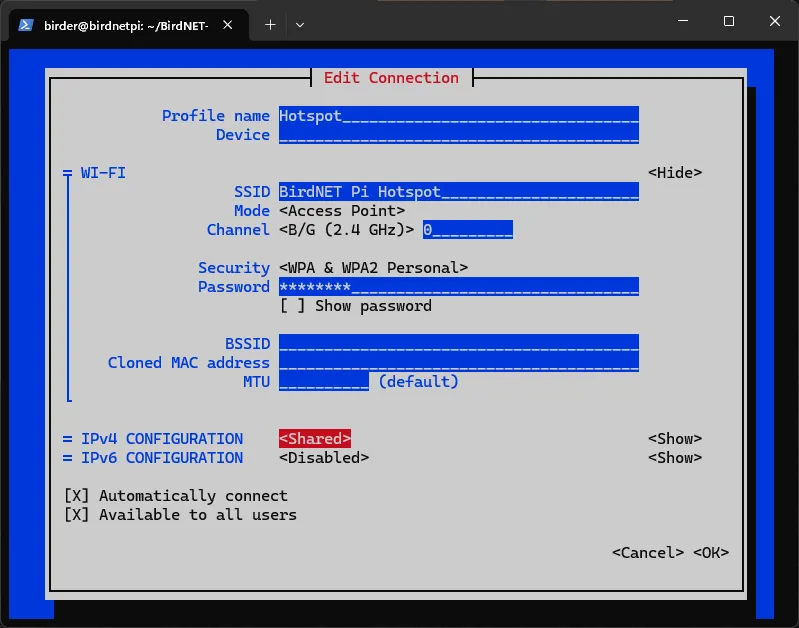
-
Select
OKat the bottom. -
Optional: Add your home Wi-Fi network by repeating steps 5 to 13. In this case, enter the credentials of your home network — Profile Name (recommended:
Home), Devicewlan0, SSID (name of your home Wi-Fi), Mode Client (default), SecurityWPA & WPA2 Personal, Password (of your home Wi-Fi), IPv4/IPv6 ConfigurationAutomatic(default). This allows the BirdNET-Pi to automatically connect to your home Wi-Fi when it is available. -
Select
Back.
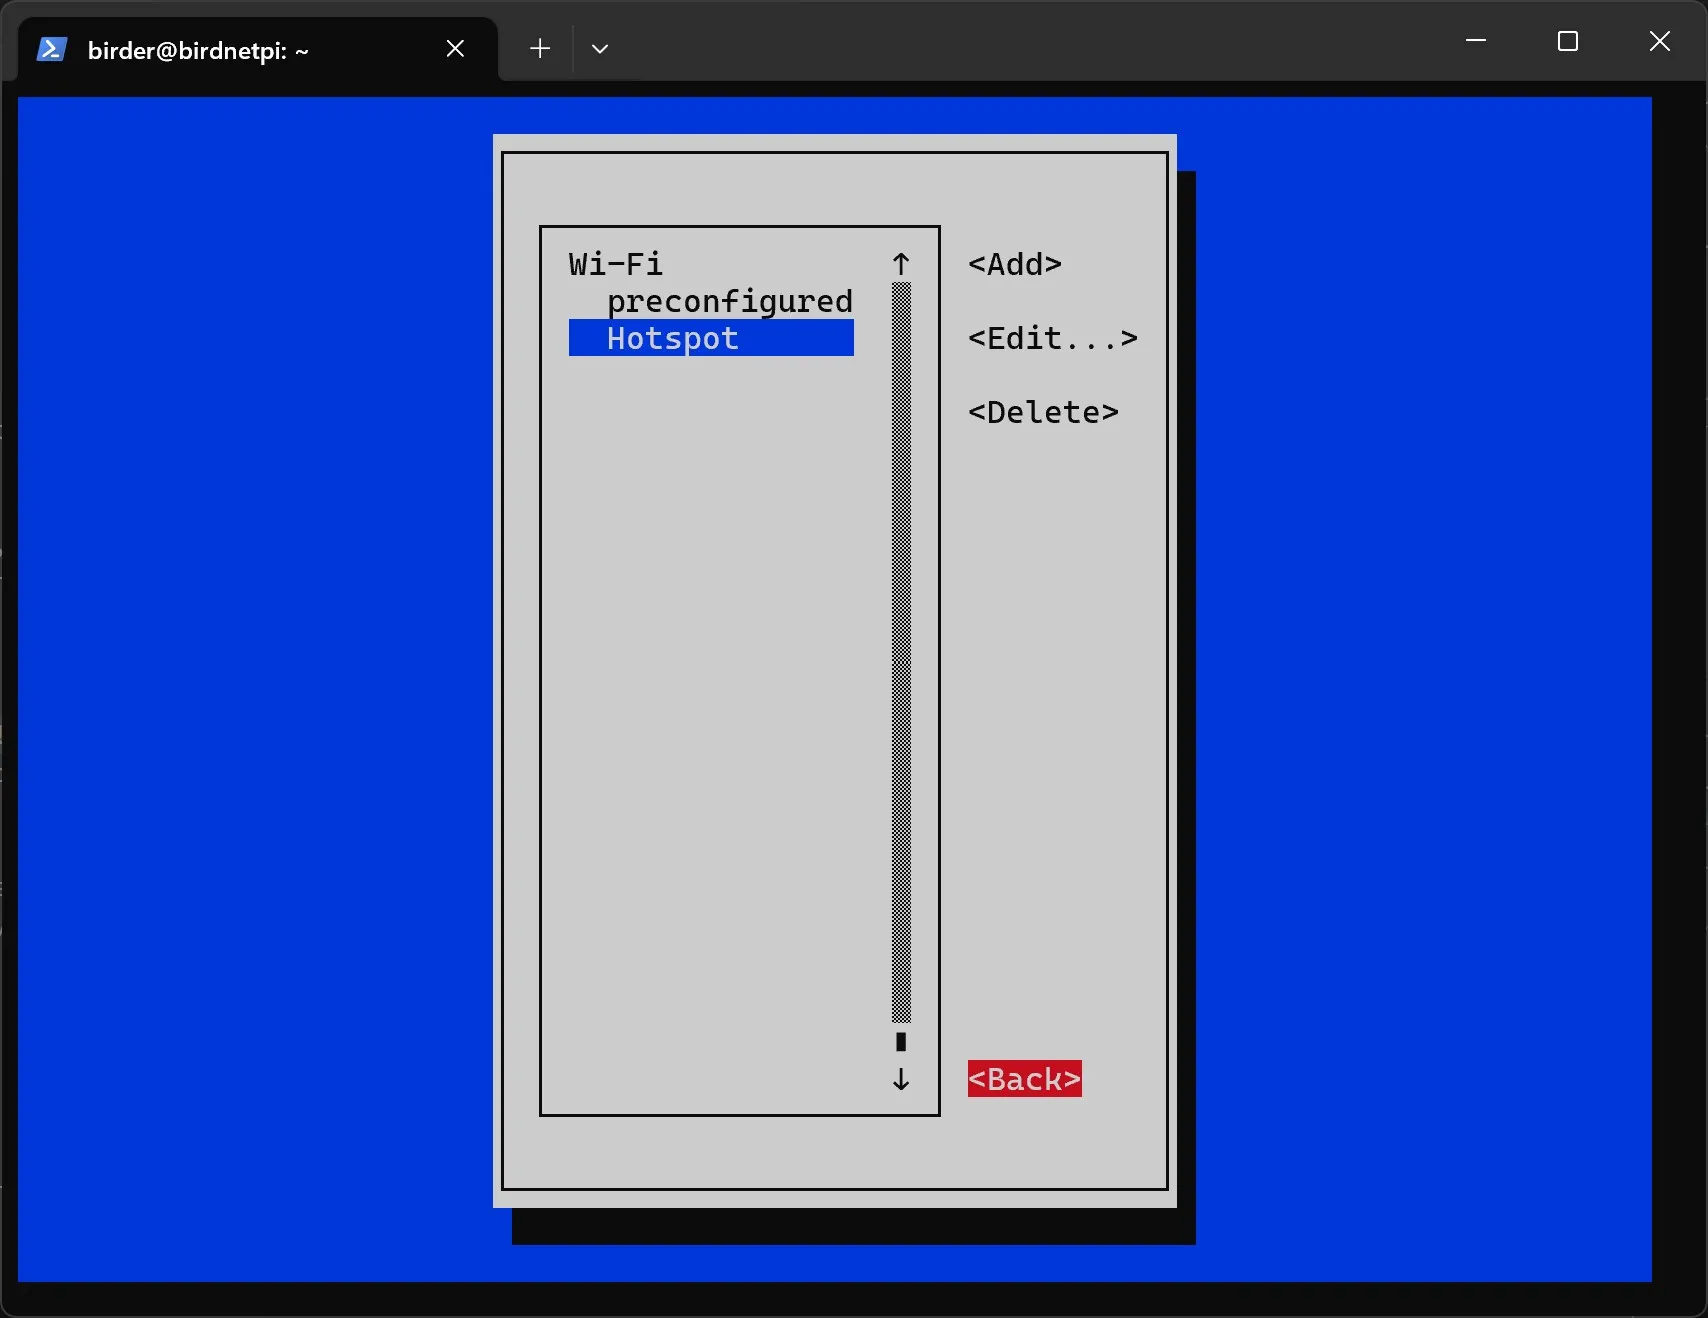
- Select
Quit.
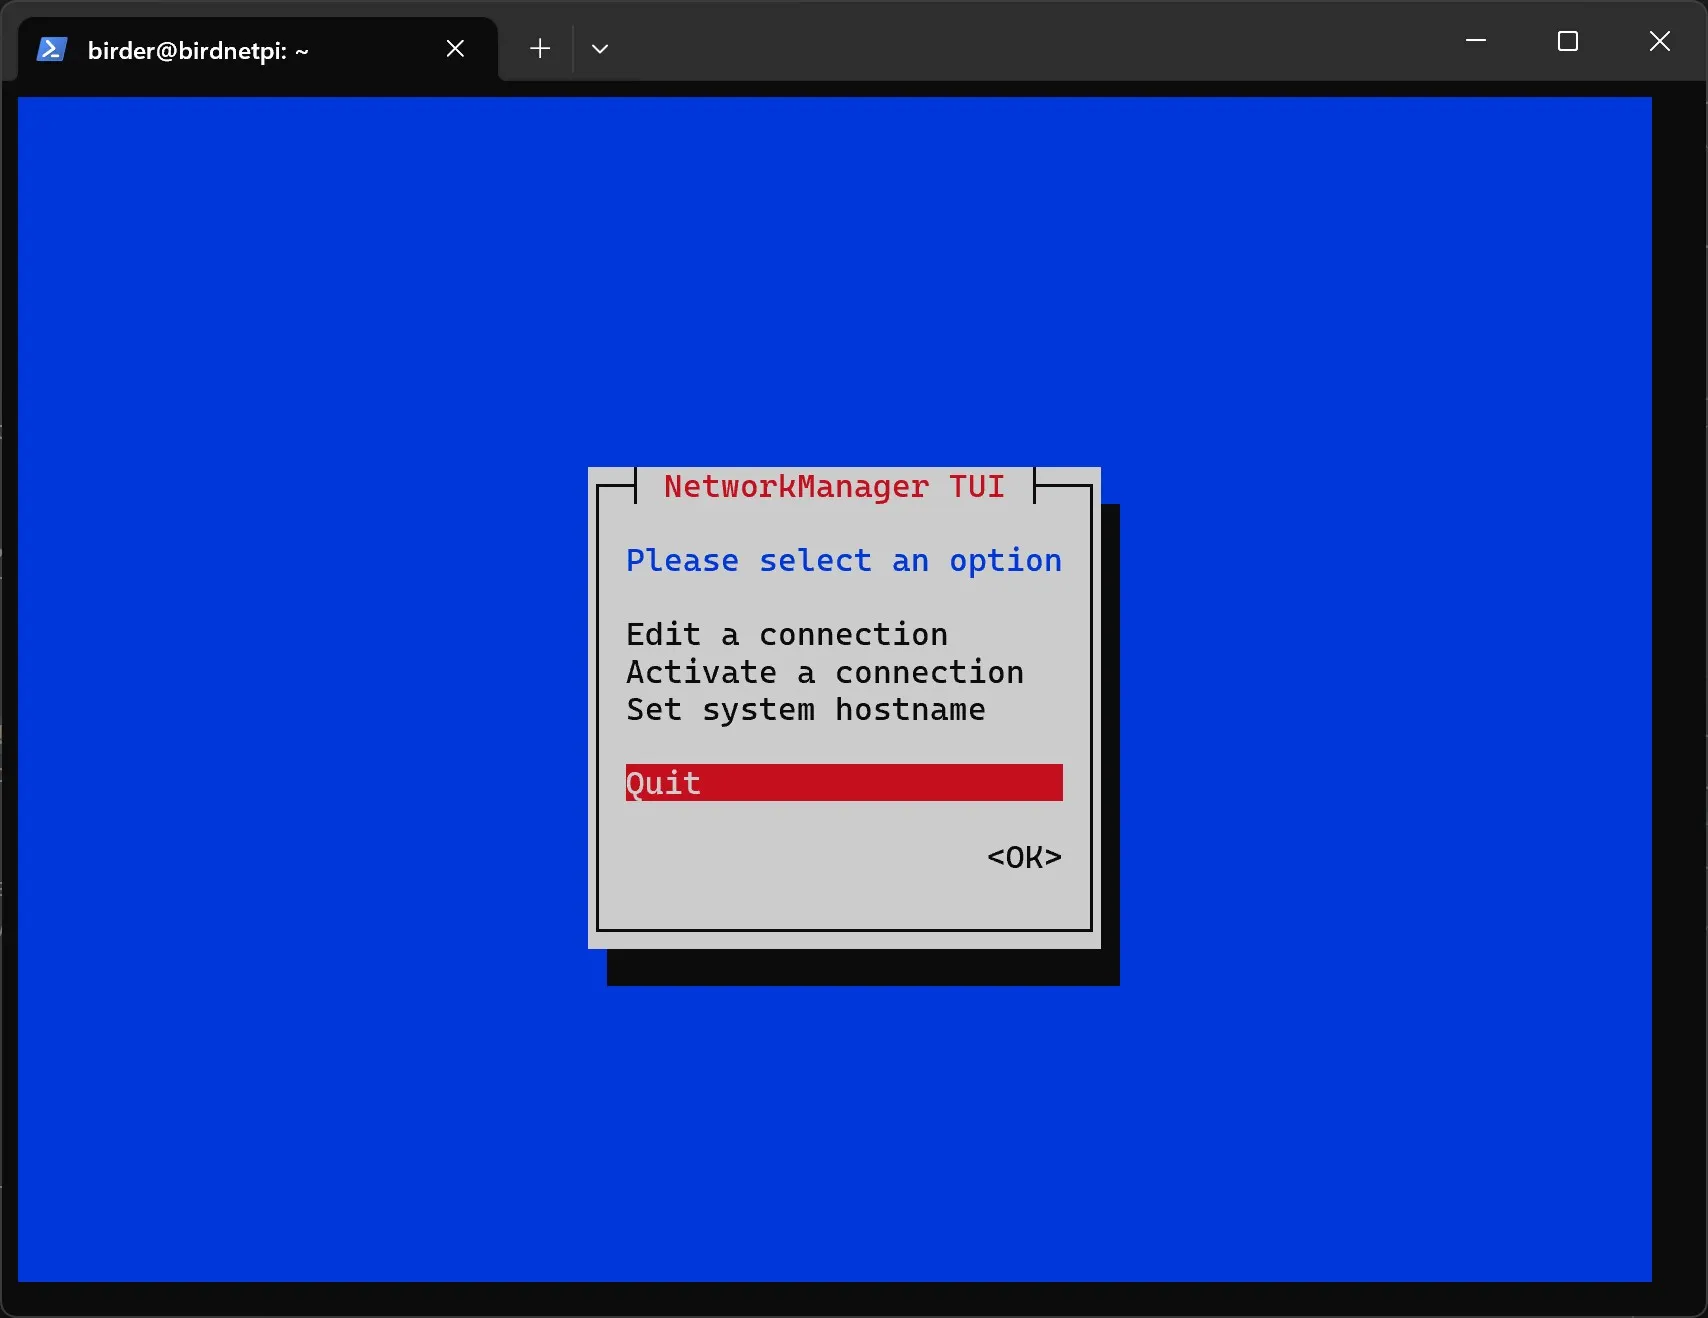
Instructions (Set connection priorities)
- Now we will set the connection priorities for the Wi-Fi and hotspot connections. This means that the Raspberry Pi will first attempt to connect to the known Wi-Fi network. Only if no connection is possible will it automatically create its own hotspot so that a connection to the device can still be established. First, we need to navigate to the correct folder using the
cdcommand.
cd /etc/NetworkManager/system-connectionsbirder@birdnetpi:~ $ cd /etc/NetworkManager/system-connections
birder@birdnetpi:/etc/NetworkManager/system-connections $- Let’s open the file for the hotspot connection. (If you chose another profile name for the hotspot, replace
Hotspotwith your chosen name in the following commands.)
sudo nano Hotspot.nmconnection GNU nano 7.2 Hotspot.nmconnection [connection]
id=Hotspot
uuid=4cc09b40-6ef0-4caf-bbf6-600fe2121122
type=wifi
[wifi]
band=bg
mode=ap
ssid=BirdNET Pi Hotspot
[wifi-security]
key-mgmt=wpa-psk
psk=Here is your password for the hotspot
[ipv4]
method=shared
[ipv6]
addr-gen-mode=default
method=disabled
[proxy]
[ Read 23 lines ]
^G Help ^O Write Out ^W Where Is ^K Cut ^T Execute ^C Location
^X Exit ^R Read File ^\ Replace ^U Paste ^J Justify ^/ Go To Line- Insert the following code snippet into the first part of the file. The entry
autoconnect=trueactivates automatic connection establishment. The valueautoconnect-priority=0sets the priority of the network. The higher the number, the more preferred this network is when connecting automatically.
autoconnect=true
autoconnect-priority=0 GNU nano 7.2 Hotspot.nmconnection * [connection]
id=Hotspot
uuid=4cc09b40-6ef0-4caf-bbf6-600fe2121122
type=wifi
interface-name=wlan0
autoconnect=true
autoconnect-priority=0
[wifi]
band=bg
mode=ap
ssid=BirdNET Pi Hotspot
[wifi-security]
key-mgmt=wpa-psk
psk=Here is your password
[ipv4]
method=auto
[ipv6]
addr-gen-mode=default
method=auto
[proxy]
^G Help ^O Write Out ^W Where Is ^K Cut ^T Execute ^C Location
^X Exit ^R Read File ^\ Replace ^U Paste ^J Justify ^/ Go To Line-
Press Ctrl+S and then Ctrl+X to save and close the file.
-
Now let’s open the file for the preconfigured Wi-Fi connection. (This is the workshop Wi-Fi.)
sudo nano preconfigured.nmconnection GNU nano 7.2 preconfigured.nmconnection [connection]
id=preconfigured
uuid=fh6c02n6-5th7-4911-9g5c-d356zh245
type=wifi
timestamp=27604593
[wifi]
hidden=true
mode=infrastructure
ssid=Wlan_Name
[wifi-security]
key-mgmt=wpa-psk
psk=4c9ed4tg67fd672c6876d1ec9e1g885a61f4th322be
[ipv4]
method=auto
[ipv6]
addr-gen-mode=default
method=auto
[proxy]
[ Read 23 lines ]
^G Help ^O Write Out ^W Where Is ^K Cut ^T Execute ^C Location
^X Exit ^R Read File ^\ Replace ^U Paste ^J Justify ^/ Go To Line- Insert the following code snippet into the first part of the file.
autoconnect=true
autoconnect-priority=10 GNU nano 7.2 preconfigured.nmconnection [connection]
id=preconfigured
uuid=fh6c02n6-j705-4911-9g5c-d36127245
type=wifi
timestamp=27604593
autoconnect=true
autoconnect-priority=10
[wifi]
mode=infrastructure
ssid=Wlan_Name
[wifi-security]
key-mgmt=wpa-psk
psk=4c9efd672c68947g4884e4f62744756d1ec9e1g885a61f322be
[ipv4]
method=auto
[ipv6]
addr-gen-mode=default
method=auto
[proxy]
[ Wrote 27 lines ]
^G Help ^O Write Out ^W Where Is ^K Cut ^T Execute ^C Location
^X Exit ^R Read File ^\ Replace ^U Paste ^J Justify ^/ Go To Line-
Press Ctrl+S and then Ctrl+X to save and close the file.
-
Optional: If you configured your home Wi-Fi network, open the file for the ‘Home’ Wi-Fi connection. If you didn’t, skip to the last step. (If you chose another profile name for the Wi-Fi network, replace
Homewith your chosen name in the following command.)
sudo nano Home.nmconnection GNU nano 7.2 Home.nmconnection [connection]
id=Home
uuid=fh6c02n6-5th7-4911-9g5c-d356zh245
type=wifi
timestamp=27604593
[wifi]
mode=infrastructure
ssid=Wlan_Name
[wifi-security]
key-mgmt=wpa-psk
psk=4c9ed4tg67fd672c6876d1ec9e1g885a61f4th322be
[ipv4]
method=auto
[ipv6]
addr-gen-mode=default
method=auto
[proxy]
[ Read 23 lines ]
^G Help ^O Write Out ^W Where Is ^K Cut ^T Execute ^C Location
^X Exit ^R Read File ^\ Replace ^U Paste ^J Justify ^/ Go To Line- Insert the following code snippet into the first part of the file.
autoconnect=true
autoconnect-priority=9 GNU nano 7.2 Home.nmconnection [connection]
id=Home
uuid=fh6c02n6-j705-4911-9g5c-d36127245
type=wifi
timestamp=27604593
autoconnect=true
autoconnect-priority=9
[wifi]
hidden=true
mode=infrastructure
ssid=Wlan_Name
[wifi-security]
key-mgmt=wpa-psk
psk=4c9efd672c68947g4884e4f62744756d1ec9e1g885a61f322be
[ipv4]
method=auto
[ipv6]
addr-gen-mode=default
method=auto
[proxy]
[ Wrote 27 lines ]
^G Help ^O Write Out ^W Where Is ^K Cut ^T Execute ^C Location
^X Exit ^R Read File ^\ Replace ^U Paste ^J Justify ^/ Go To Line-
Press Ctrl+S and then Ctrl+X to save and close the file.
-
Now restart the Raspberry Pi.
sudo reboot